We are new to pneumatics. My students have figured out to activate the cylinders easily enough. They want to find out a way to get the cylinder to stay extended without holding the activation button on the controller, much like when using a “hold” command on a motor.
Is there a way to do this? Thanks!
Hello @Curt_Kornhaus!
Absolutely, here’s how you can configure the VEX pneumatic system to achieve the desired behavior:
If Using Two Controller Buttons:
- Configure your project by adding a Controller device and a 3-Wire device Digital out.
- In your VEXcode V5 project:
- Add a ‘set digital out’ block to the ‘[when started]’ block. Set it to ‘low’ to ensure the pneumatic cylinder begins fully retracted.
- Create an event with ‘[when Controller button pressed]’ for the extension. For example, use button L1. Add a ‘[set DigitalOut]’ block and select ‘high’ for the digital out setting.
- Similarly, for retraction, add another event with ‘[when Controller button pressed]’ – for instance, button L2. Insert a ‘[set DigitalOut]’ block and leave it as ‘low’ for the digital out setting.


If Using a Single Controller Button:
- Configure your project similarly with a Controller device and a 3-Wire device Digital out.
- In your VEXcode V5 project:
- Add a ‘set digital out’ block to the ‘[when started]’ block and set it to ‘low’.
- Create a Boolean variable, name it something like ‘digitaloutON’.
- Set this Boolean to ‘’.
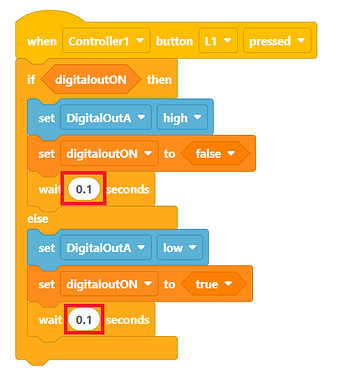
- Create an event with ‘{when Controller button pressed}’, e.g., button L1.
- Insert an ‘[if then else]’ block, using the ‘digitaloutON’ Boolean in the if condition.
- In the ‘then’ part, add a ‘[set DigitalOut]’ block and set it to ‘high’. In the ‘else’ part, set it to ‘low’.
- Toggle the Boolean state after every button press, using ‘[set digitaloutON]’ blocks.
Lastly, add a brief ‘[wait]’ block of (0.1) seconds in both sections of the ‘[if then else]’ block.
If you want a detailed walkthrough with visuals and further information, the article from the VEX Library titled VEX Library V5 Mechanical Controlling Pneumatics Using Buttons on Your Controller is a great resource and where this information came from.
Additionally, we have the following articles also from the VEX Library that’ll help you on your air powered journey!
- Pneumatics
If you need anything else, don’t hesitate to reach out to us or book a 1-on-1 session here. ![]()
Great explanation @Matthew_Goodwin, thanks ![]()
How would we do the same thing in Vexcode Pro? Thanks
Did you happen to see my reply on Friday about us using text based coding?
The C++ code for VEXcode and VEXcode Pro are the same. So you can use the same code in either application.
If you want to convert a VEXcode blocks projects to a C++ Text project so that you can use it in VEXcode Pro, you can find instructions on converting to text at https://kb.vex.com/hc/en-us/articles/360044971772-Converting-a-Blocks-Project-to-Text-in-VEXcode-V5. Please note that you will need to manually copy the code from VEXcode to VEXcode Pro for this to work. You will also need to make sure that your device names are the same or change the names in the code to match.
For simplicity I have also provided the blocks examples converted to C++.
The equivalent code for the 2 button example previously provided would be the following.
// "when Controller1 ButtonL1 pressed" hat block
void onevent_Controller1ButtonL1_pressed_0() {
  DigitalOutA.set(true);
}

// "when Controller1 ButtonL2 pressed" hat block
void onevent_Controller1ButtonL2_pressed_0() {
  DigitalOutA.set(false);
}

int main() {
  // register event handlers
  Controller1.ButtonL1.pressed(onevent_Controller1ButtonL1_pressed_0);
  Controller1.ButtonL2.pressed(onevent_Controller1ButtonL2_pressed_0);

  // Short delay to make sure the events are fully registered
  wait(15, msec);

  // add main project code here...
}
You can find the converted single button example below.
bool digitalOutOn;

// "when Controller1 ButtonL1 pressed" hat block
void onevent_Controller1ButtonL1_pressed_0() {
  if (digitalOutOn) {
    DigitalOutA.set(true);
    digitalOutOn = false;
    wait(0.1, seconds);
  }
  else {
    DigitalOutA.set(false);
    digitalOutOn = true;
    wait(0.1, seconds);
  }
}

int main() {
  // register event handlers
  Controller1.ButtonL1.pressed(onevent_Controller1ButtonL1_pressed_0);

  // Short delay to make sure the events are fully registered
  wait(15, msec);

  // add main project code here...
}
Hi @Curt_Kornhaus are you all set with this information now? Please let us know ![]()
Yes, we are. Thank you.

