Distance Sensor Gone Wrong!

Hi everyone.

I am just wrapping up Castle Crasher with my 8th grade students. We have had some ups and downs throughout the semester, but finally on competition day, some previously unseen errors occurred.

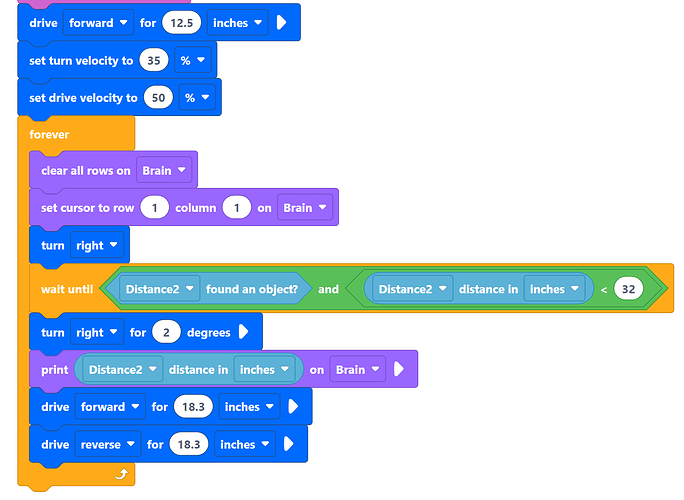
I’m reaching out to gather some info on different factors that may influence the distance sensor. Since every team’s code is unique, I will provide one snippet of a sample from a student whose is pretty straightforward (although it may not be the most effective strategy for the game).

When this student ran their program earlier, the value printed on the brain was 9999 - I have sometimes seen this when pointing the sensor at a computer screen- and the robot drove right off the field at, seemingly, nothing! I ran it just now and had no such issues; the robot correctly detected the distance to the nearest cubes and consistently drove toward them. In another case, a team’s robot printed a distance of 2-10" when there was no cube in line of sight.

Our build is the Autopilot build from the build instructions. Some teams have modified the placement of the Color Sensor, but the Distance Sensor is generally in the position instructed.

I know that others have posed the question before, but I wonder if anyone can share some issues they have had with the distance sensor - whether it is interference from human players, lighting, reflective surfaces nearby, Acts of God or a Wizard’s Curse… I’m just wracking my brain for possibilities!

Thank you in advance for any ideas you may have!

1 Like

Hi @Rae_Johnson, there are a few things that could be interfering with the Distance Sensor’s reporting. As you suspected, interference from human players or objects in the environment could definitely be playing a role.

One thing to note about the IQ (1st gen) Distance Sensor is that it operates using sound waves. The sensor calculates distance by using the time it takes for ultrasonic waves to bounce off of an object and return to the sensor. This means that the sensor could be reporting the distance to ANY object - not just a Cube - within it’s ‘field of view’, so to speak. So depending on what is around the Field, it could be picking up something else in the area (like a student or an object further away).

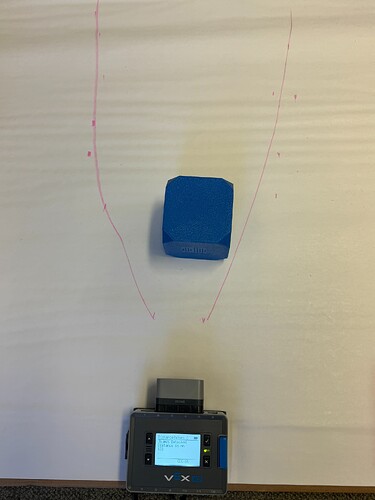
There’s actually a really cool activity you can do to help students better understand the where/how the Distance Sensor can detect objects! Using the Brain and the Distance Sensor, a large piece of paper, a marker, and an object you can actually test and draw out the sensor’s ‘field of view’. Like this:

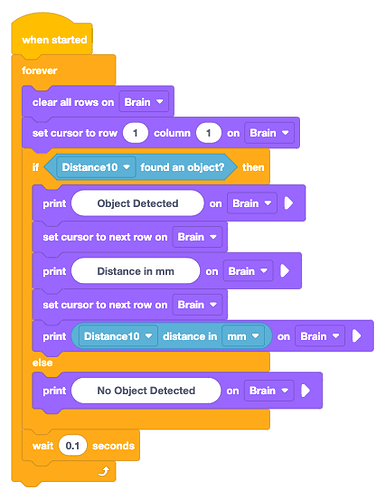
This is the project I used for this little ‘experiment’:

To set it up make sure the Distance Sensor is on the edge of a large piece of poster paper, facing forward and not getting any interference around it. So when the project is started, it should report ‘No Object Detected’ to start. Then move a Cube in front of the sensor, and you’ll see the reading pop up on the Brain. Slowly move the Cube to the left/right of the sensor, and watch the reading on the Brain. When it reports ‘No Object Detected’ - mark where the Cube is. Keep repeating this process, moving the Cube further away from the sensor, and moving it left and right to get a series of marks where the ‘bounds’ of the sensor’s readings are. Then you can essentially connect the dots and get an approximation of the sensor’s range. Here’s a little wee video to show you what I mean (you’ll see the marks I made before I drew the lines on the paper. Then I video’d it to get a sample to share.)

The really neat thing about this, is that you can then cut out the paper, and give students an actual tangible representation of what the sensor can detect. And they can see how that ‘cone’ shape moves with the robot as it moves. Doing something like this can help students to get a better understanding of how the sensor works and what it reports, so they can mitigate interference a little better, and use the sensor more effectively. For instance, a Cube might start out ‘detected’, and the Cube will stay in the same place, but as the robot moves, it may become ‘undetected’ based on it’s position in relation to the Distance Sensor.

The other thing you’ll notice when you do this, is how quickly the sensor readings change - this can help students to better understand why using a range of values in their projects (like distance < 50 or distance > 30) can work better than using something like distance = 20. It’s very hard to land exactly on a particular value, and only the exact value will report as ‘TRUE’. Using a range of values can be much more reliable. Because then if the Distance Sensor reports 20.5 or 21, or 20.15 it’s still greater than 20, so will report ‘TRUE’, and still be effective.

I hope this is helpful! I’d be happy to walk through this experiment in a 1-on-1 Session with you too :slight_smile:

1 Like

This is extremely helpful. I didn’t specify that we are using the gen1 parts, but I have made my students aware of the range of the distance sensor (40"). We tried to clear the area around the field, but the room is still pretty small and even cubes that fell off the raised field would sometimes trigger the behavior associated with the distance sensor.

I encouraged them to use conditional statements with comparisons to decide what distance the robot should be moving, but some more advanced students figured out how to use the ‘distance in inches’ block to reliably drive the robot to the colored cube. Some also decided - if the robot was turning UNTIL the distance sensor picked up an object - they could compensate for over/undert-turning by using a ‘wait’ command and turning the robot a few degrees less/more.

I appreciate how student-focused your answer was, because my main concern has been not “how does this work?!” but “how would my students have been able to figure out how this works?!” I think doing this experiment before they began their path planning would have been really useful. And I do appreciate how the Example projects in VEXCode emphasize the use of printing blocks :smiley:

2 Likes

I’m so glad to be of help! You talked about using the “Autopilot” build in your original post, which made me think you were using Gen 1 Kits. If you’re using Gen 2 materials - the same experiment can be done. You may notice a slightly different ‘pattern’ to the results :slight_smile: The Gen 2 distance sensor uses a pulse of (classroom-safe) laser light to measure the distance from the front of the sensor to an object. So you may notice that the ‘field of view’ is a little more narrow but much longer, so to speak. But the same experience would still benefit your students to learn more about how the sensor functions, so they can use it more effectively!

1 Like

I forgot to clarify - are you able to explain why the distance sensor would ever print a reading of 9999"? This has been problematic for teams with otherwise reasonable code. Because this reading usually coincides with the distance sensor ‘detecting an object,’ but the distance is not one the robot is programmed to respond to, it usually results in total disappointment for the team. I’m only worried that they feel they’ve done everything they can, and this unexplainable problem still gets in the way of their success.
Thank you again Audra!

Hi @Rae_Johnson - great question. I’m not entirely sure where the 9999 value comes from, but perhaps @Jacob_Palnick could explain it?

The sensor returns the large number like that so that code that looks at the distance old does not need to deal with a negative value for no object detected. It is far easier for the code to say “while distance is more than 400mm, keep driving” than “while distance is more than 400mm or less than 0, keep driving”.

The sensor originally returned -1 if there was nothing detected, but we kept seeing issues where students would no understand that -1 is no object detected and could be considered further away than 1m. So to help make this easier to explain to the students, we changed it to return a value that could never actually be seen by the sensor. I had thought that the value was 3000mm, but maybe my memory of that is wrong since it has been years since that was changed.

1 Like