TLDR Demo: MIDI Controlled Robot Routine
Demo Link: https://youtu.be/HXWcb1FNVhU
Problems with the first build
The perfectionist in me feels like this can be better optimised and I’m figuring out a solution for these issues:
- Reduce the need for manual timing
- Separation of Movement and Singing logic
- Higher level abstraction for movements
Problem 1: Fixing the Sync-ing Issues
The issue:
In the previous code, the instructions are run sequentially.
This works okay for a single robot.
However, when we try to run play_note() asynchonously using Threads, even though the function is triggered but the next instruction is called immediately without waiting for the thread to finish.
The hack I introduced was to manually add a delay - but it is TEDIOUS! I literally had to sit there and adjust the durations to achieve the right timing.
The wait() call strategy was rather unpredictable since playing 3 crotchets was not the same timing as 6 quavers…
This was because sound.play_note() does not block the thread but rather plays asynchronously.
The Thread API does not have the typical join or await features which make it hard to synchronize precisely with the music.
This means we can’t really rely on the instruction call order to carry the beat.
Solve Problem 1: The Sequencer
The MIDI format is a good simple way to sequence the timing of music.
The format is written as Messages that tell when the notes are on and off.
We can find the time differences between the notes and calculate the duration of each note to play.
This reduces the need for writing specific code for note lengths.
MIDI is also a well-supported format and there are many editors available to create, view and edit the files.
There are many libraries for handling MIDI format.
I used mido and found it worked for my purposes.
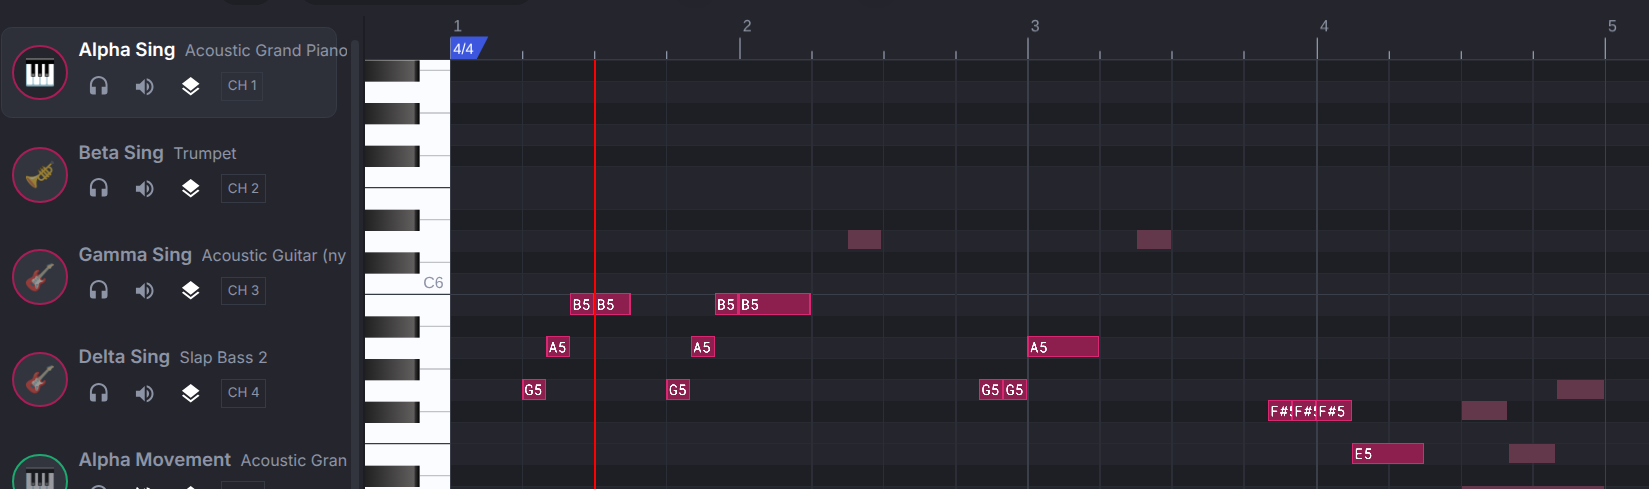
Script Architecture
The musical notes were moved into different channels based on which robot I wanted to play it.
For my robots, I set these up:
Alpha: Channel 1
Beta: Channel 2
Gamma: Channel 3
Delta: Channel 4
There are many message types in the MIDI format.
The important ones for us here is `'note_on` and `note_off`
We can use the durations to calculate the duration of the note.
The way we do this is by keeping a reference to the channel and note.
This is because MIDI allows the same channel to play many notes at the same time.
Problem 2: Song Code is mixed with Movement Code
When we have code that overlaps the sound notes to play with the movement, we’d say that these two features are “tightly coupled”.
This makes it hard to change one thing in isolation.
Every alteration feels like surgery and you’ll need to make sure that the whole thing stays intact.
Solve Problem 2: Event-based instructions
A different way to structure our code is through event-based triggering of instructions. This works well when our code is asynchronous (using Threads)
This is particularly useful for us in this case since we need precise timing. The MIDI sequencer allows us to run a single main thread on our computer that keeps the correct timing. The script will keep the timing and whenever it arrives at the right time to do an action or play a note, it will send out an instruction to the robots as an “event”.
This means the robots don’t really have to keep any timings. They just listen out for the events and act immediately upon receiving them.
MIDI controlled Movement
The MIDI formatting is helpful since we can also hijack the notes in the score to ask the robots to perform actions INSTEAD OF playing notes.
In this way, we can actually control the robot and sequence the movements nicely to the music.
To make the segregation even easier to see, I kept the movements in their own channels. AND I used a lower octave.
This means that I can easily align the movement signals I want with the song timings.
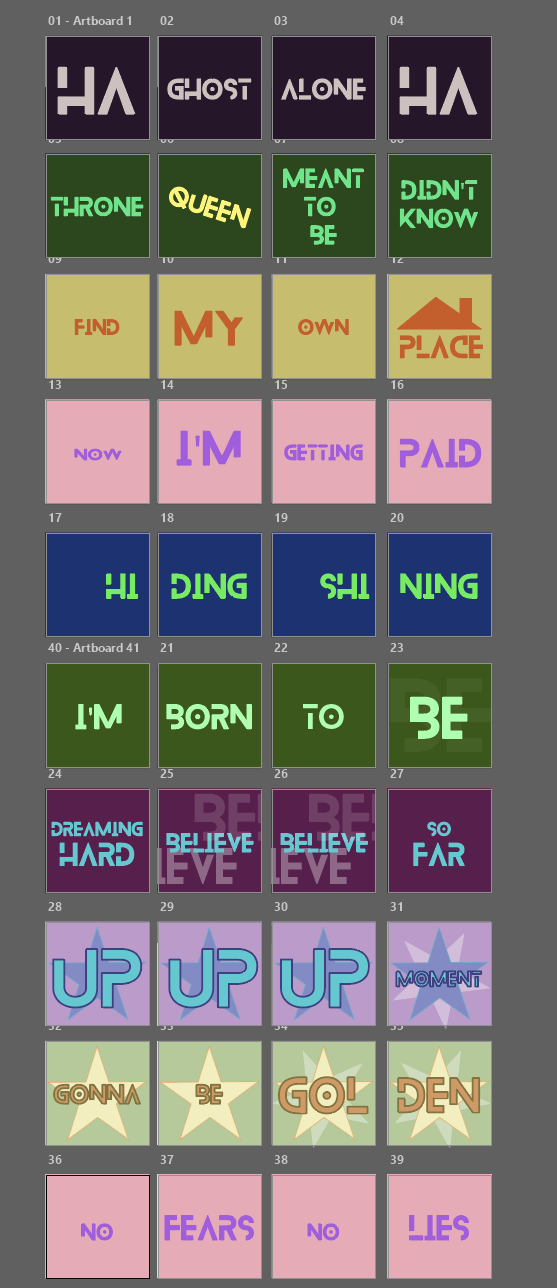
MIDI controlled Custom Images
Just like how we can coordinate our movements with notes, we can also coordinate the images we want to display on the screen.
In the first script, I used the emoji APIs to display faces.
Alternatively, there seems to be an API where we can use custom images to display on screen.
There is a limit of 10 custom images that we can upload to our screen.
The screen size is 240 x 240 pixels.
I used Illustrator to create a story board for each of the screens I wanted to show up on my robot screens.
To access the images, I would use the show_file() function and call the image name.
It didn’t seem documented but the naming system seems to be image1.png all the way to image10.png
Just like how I separated the movement logic, I used separate MIDI channels to separate the MIDI messages.
Problem 3: Movement Abstraction
The movement of the robots is quite nice.
You can move the robot direction by Vectors, Heading, and keep steady motion.
However, the problem with controlling the robots at such low levels means that it’s difficult to manage and you’ll have lots of code to manage.
Solve Problem 3: Formations
To make life easier, I wrote a level of abstraction for the movements of the robots to move to certain formations.
E.g. I would make a 1x4 robot formation (1 row of 4 robots) and align them based on their self-identified XY position. I would extend this idea to a 2x2 robot formation (2 rows of 2 robots).
Before the start of the routine, I would place the robots 100mm apart.
I would call set_xy_position() on each of them and set their starting positions.
robot_alpha.set_xy_position(0, 0)

robot_beta.set_xy_position(-SPACING, 0)

robot_gamma.set_xy_position(2 * -SPACING, 0)

robot_delta.set_xy_position(3 * -SPACING, 0)
Once the starting positions are established, I can have them move to my desired formations.
Each of the formations are calculated using cartesian coordinates.
Of the movement APIs that the robots have, one key missing one was a move_to_xy()`function. This would make my life easier because, the robots can determine the distance and heading to take when it’s instructed to move from it’s current position to a desired coordinate.
So I had to write my own:
def move_to(robot_id, desired_x, desired_y, robot, direct = False, forward_first = True):

    x_start = robot.get_x_position()

    y_start = robot.get_y_position()

    distance_x = desired_x - x_start

    distance_y = desired_y - y_start


    print(f"Robot {robot_id} will move from ({x_start}, {y_start}) to ({desired_x}, {desired_y})")

    print(f"Robot {robot_id} Distance: {distance_x}, {distance_y}")


    if direct:

        distance_direct = math.sqrt(distance_x ** 2 + distance_y ** 2)

        angle = math.atan2(distance_y, distance_x)

        robot.move_for(distance_direct, angle)

    else:


        if forward_first:

            robot.move_for(distance_y, 0)

            robot.move_for(distance_x, 90)

        else:

            robot.move_for(distance_x, 90)

            robot.move_for(distance_y, 0)


        x_end = robot.get_x_position()

        y_end = robot.get_y_position()


        print(f"Robot {robot_id} moved from ({x_start}, {y_start}) to ({x_end}, {y_end})")
The good thing about the `move_for()` function is that it can handle negative distances which reduced the complexity of my code a lot.
Here, the `direct` flag asks the robot to perform a direct movement to the position.
This calculates the heading. (I haven’t tested this out… I’m pretty sure I’ve messed up the signs here)
When `direct` is off, the robots would move in a gridlike manner. `forward_first` defines whether to choose the forward/back motion first before performing the sideways movement or vice-versa.
Conclusion
I’m much happier with this result than the one before. It’s still not without bugs. I’m still coming into issues with movement timings, delayed messages and robot displacement.
However, hope you found this helpful! (or at least entertaining)