From navigating autonomous driving to scoring targets in a competition, robots need to perceive and interact with their environment precisely to accomplish tasks. Using the new technology, the AI Vision Sensor provides powerful object detection capabilities to the VEX V5 and EXP Robots, significantly enhancing their potential to perform various tasks.
Acting effectively as an eye, the AI Vision Sensor enables the robot to “see” and understand its surroundings. It captures images and video feeds with the camera, and reports real-time sensing data that tells the robot if it detects specific Colors, game objects, or AprilTags, as well as detailed information about the detected object, such as its size (width and height), position on the AI Vision Sensor’s screen (centerX, centerY, angle), etc. Based on this data, the robot can make informed decisions and trigger actions to complete the tasks successfully.
How to use the AI Vision Sensor to direct the VEX robot to accomplish a task? Let’s create a simple project where we instruct an EXP Robot to find the red ball and drive to the position 15 centimeters distant from it, demonstrating this process.
Before we start the project, let’s figure out the procedure to complete this task first. Imagine a human trying to find and move toward a red ball on the field, the steps would include: 1. Preparing for the task and getting the information about the ball, such as its color; 2. Looking around to search for the ball based on this information; 3. When the ball is in view, moving towards it until reaching the specific spot based on its observed position. To conduct the robot to perform this task, we can replicate the same process.
1. Preparing for the task – Setup and Configuration
a. ) Mounting the AI Vision Sensor
Before creating the project, we need to secure the AI vision sensor to the EXP ClawBot first, ensuring there is no structure on the robot that obstructs the camera’s view when detecting objects. For detailed instructions on how to mount the AI Vision Sensor to an EXP ClawBot, please see this article.
b. ) Configuring the device - Connecting the AI Vision Sensor to VEXcode EXP
To use the AI Vision Sensor in a VEXcode EXP project, we must add the AI Vision Sensor as a device within VEXcode EXP, and establish a successful connection between the sensor and VEXcode EXP. For detailed instructions, please see this article.
c. ) Configuring the Color Signature
To enable the AI Vision Sensor to recognize colored objects, we must configure the Color Signature with the AI Vision Sensor, “telling” the sensor what color to detect. For detailed instructions, please see this article.
2. Searching the ball
Once the AI Vision Sensor and the Visual Signatures are configured in VEXcode EXP, a new set of AI Vision Sensing blocks will be available.
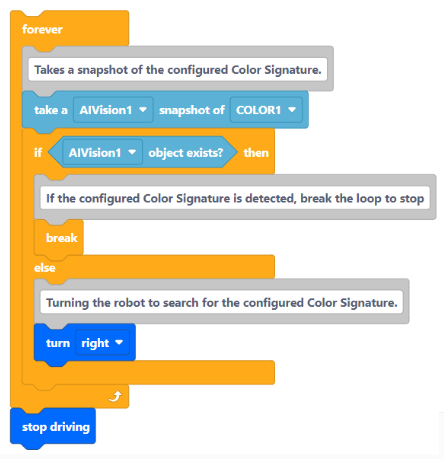
We can use the [Take snapshot] block and the [object exists] block to access the data captured by the AI Vision Sensor and figure out if the AI Vision Sensor detects the configured Color Signature.

To search for the ball, our coding strategy is to turn the robot, checking if the Color Signature is in its view. If the Color Signature is detected, the robot stops turning, preparing to drive to the ball.
3. Driving to the ball
a. ) Understanding the [AI Vision object] blocks
The AI Vision Sensor reports detailed information about the detected object. We can use the [AI Vision object] blocks to access the size data (width and height) and the position data (centerX and centerY) of the detected object to determine its relative position and distance to the robot.

b. ) Data collection and analysis
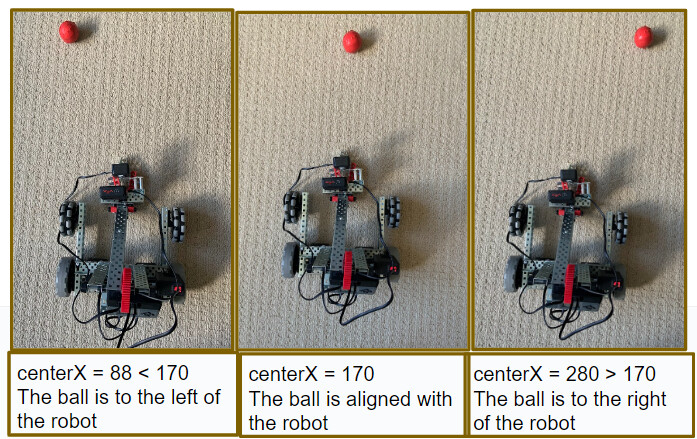
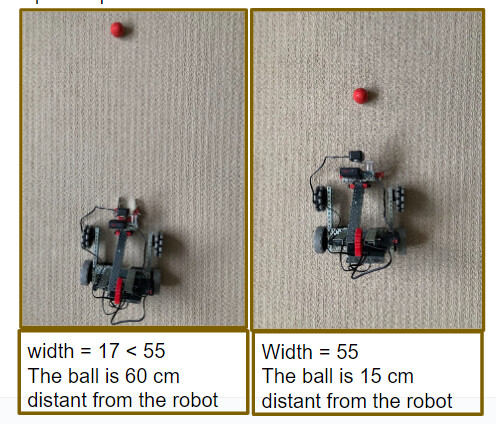
We can place the robot at various positions relative to the red ball, collect the centerX and width values of the detected object with the AI Vision Sensor, and analyze what the data “tells” us.
The centerX value can tell us whether the robot is to the left or right of the red ball.
The width value can tell us how close the robot is to the red ball and whether the robot has reached the specific spot.
Tips:
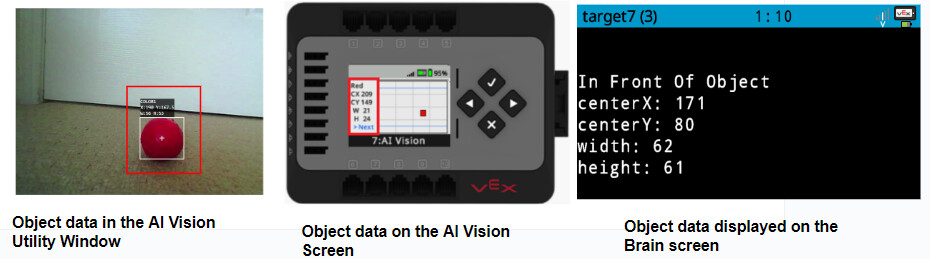
There are three ways to collect the object data with the AI Vision Sensor
- Connect the AI Vision Sensor to your computer and read the data in the AI Vision Utility Window. For detailed instructions, please see this article.
- View the AI Vision Screen on the EXP Brain to read the data of a selected Color Signature (Red, Blue, Green, or Yellow)… For detailed instructions, please see this article.
- Code the robot to display the object data on its Brain screen.
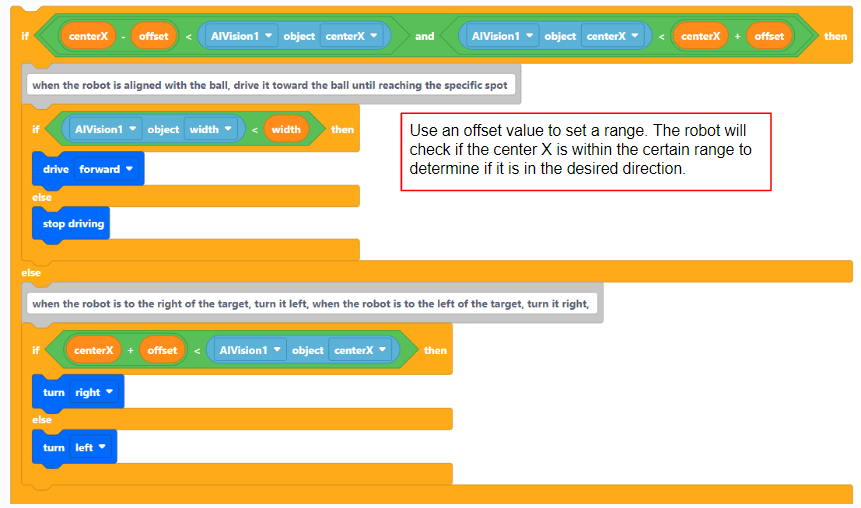
c. ) Project Development
Based on the collected data, we can use the AI Vision Sensor to navigate the robot to the specific Position. Our coding strategy is using the centerX value to align the robot with the red ball and using the width value to guide the robot to drive toward the ball.
Of course, after navigating the robot to the specific position with the AI Vision Sensor, we can instruct it to perform any subsequent actions, such as driving to pick up the ball or moving to another colored ball, depending on the task requirements.

In summary, by using the AI Vision Sensor to enhance a robot’s capability to perceive and interact with its environment, we will unlock significant potential for the robot to perform various exciting tasks.
Tips for Using the AI Vision Sensor:
-
Always ensure that the lighting conditions match the environment in which you configure the Visual Signatures. If the lighting condition changes, it’s important to reconfigure the Visual Signatures or tune the AI Vision Sensor to ensure the object can be recognized accurately.
-
Use the [Take snapshot] block] every time you interact with the AI Vision Sensor since the sensor relies on the most recent snapshot for its data.

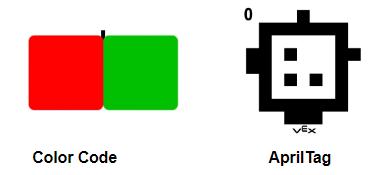
Besides identifying Color Signatures, the VEX AI Vision Sensor also provides powerful AI object detection of Color Codes, game objects, and AprilTags, opening up extensive possibilities both in the classroom and on the competition field. We will discuss these features in our future posts.
Please let us know if you have any questions, comments, or feedback. Thank you!
